Okay, friends, gather ’round because I’m about to spill the beans on a recipe that’s practically a love letter in cookie form: Red Velvet Blossom Cookies! Seriously, these little beauties are the perfect way to show someone you care, whether it’s for Valentine’s Day, a birthday, or just because. I’ve been making these for years, tweaking and perfecting them until they’re absolute perfection. Trust me, I’ve tried every variation, every trick, and every shortcut, and I’m here to share the secrets to making these cookies the best you’ve ever tasted.
I started baking these cookies back in college. I wanted to impress my then-boyfriend, and what better way to do that than with a batch of beautiful, delicious cookies? I found a basic recipe, but it needed some serious TLC. Over the years, I’ve made them for countless parties, potlucks, and late-night cravings. They’re always a hit, and I’m so excited to finally share my tried-and-true recipe with you.
I’ve baked hundreds of batches of these cookies, so I know a thing or two about what makes them sing. This recipe is a blend of my own baking experience, passed-down family traditions, and a whole lot of love. And let me tell you, these red velvet blossom cookies are more than just a dessert; they’re a guaranteed smile-maker.
Ingredients for Perfect Red Velvet Blossom Cookies
Alright, let’s talk ingredients! Because, honestly, without the right stuff, you’re just not gonna get that melt-in-your-mouth, perfect red velvet blossom cookies experience. I’m a stickler for good ingredients, so don’t skimp, okay? Trust me, the results are worth it!
Essential Ingredients for Red Velvet Blossom Cookies
- 1 cup all-purpose flour: You know, the regular kind from the grocery store.
- 1/4 cup unsweetened cocoa powder: This is the stuff that gives it that classic red velvet flavor. Make sure it’s unsweetened!
- 1/4 teaspoon baking soda: Don’t skip this; it helps the cookies rise just right.
- 1/4 teaspoon salt: A little salt enhances all the other flavors.
- 1/2 cup (1 stick) unsalted butter, softened: Room temperature is KEY here. We want it soft enough to easily cream with the sugar.
- 1/2 cup granulated sugar: For sweetness and a bit of crispiness.
- 1/4 cup packed light brown sugar: Adds a lovely chewiness and a touch of molasses flavor. Make sure it’s packed!
- 1 large egg: Just one, but make sure it’s a large one!
- 1 teaspoon vanilla extract: Always use the good stuff, not imitation. It makes a difference!
- 1/4 cup buttermilk: This is the secret ingredient for that tender crumb and slight tang. If you don’t have buttermilk, see my substitutions below!
- Red gel food coloring: Gel food coloring gives you the best, most vibrant red color. Liquid food coloring can work, but you might need more.
- Hershey’s Kisses, unwrapped: The stars of the show! You’ll need one for each cookie, so grab enough.
Ingredient Notes and Substitutions
Okay, let’s dive into a few ingredient specifics. I always get asked about subs, so here’s the lowdown:
Butter: Room temperature butter is super important. If your butter is too cold, your cookies won’t cream properly. If it’s too warm, they’ll spread too much. I usually take my butter out about an hour before I start baking.
Buttermilk Substitute: No buttermilk? No problem! You can make a quick substitute. Just add 1 teaspoon of white vinegar or lemon juice to your measuring cup, then add enough milk to equal 1/4 cup. Let it sit for a few minutes to slightly thicken before using. It works like a charm!
Cocoa Powder: Unsweetened cocoa powder is essential here. Don’t accidentally grab the hot cocoa mix! You want that pure, chocolatey flavor.
Food Coloring: Red gel food coloring is the best for getting that vibrant color without adding extra liquid to the dough. But if you only have liquid, that’s okay! Just add it a teaspoon at a time until you reach the desired shade. Be careful not to add too much, or your cookies might be too wet.
And that’s it, friends! Gather your ingredients, and let’s get baking! These red velvet blossoms cookies are waiting to happen!
How to Make Irresistible Red Velvet Blossom Cookies
Alright, now for the fun part: actually making these red velvet blossom cookies! Don’t you worry, it’s easier than you think, and the results are totally worth the effort. I’m going to walk you through it step-by-step, so you can’t mess it up! Well, maybe you *could* mess it up, but I’m here to help you avoid that! Let’s get baking!
Step-by-Step Instructions for Baking Red Velvet Blossom Cookies
- Preheat the Oven: First things first, get your oven preheating to 375°F (190°C). This is super important so your cookies bake evenly. I usually do this right at the start, so it’s ready when I am!
- Whisk Dry Ingredients: In a medium bowl, whisk together your flour, cocoa powder, baking soda, and salt. This is where you make sure everything’s evenly distributed. Set this aside for now.
- Cream Butter and Sugars: In a large bowl (or in your stand mixer if you have one – makes life easier!), cream together your softened butter, granulated sugar, and brown sugar until it’s light and fluffy. This can take a few minutes, so be patient! You want it to be nice and airy.
- Add Wet Ingredients: Beat in the egg, vanilla extract, and food coloring until everything is well combined. This is where your batter starts to turn that gorgeous red color! Don’t worry if it looks a little streaky at first; it’ll all come together.
- Combine Wet and Dry: Gradually add the dry ingredients to the wet ingredients, alternating with the buttermilk. Start with the dry, then a splash of buttermilk, dry, and then the rest of the buttermilk. Mix until just combined. Don’t overmix! You don’t want tough cookies.
- Shape the Dough: Scoop out rounded tablespoons of dough and roll them into balls. You can use a cookie scoop for this if you have one, or just eyeball it!
- Bake: Place the cookie dough balls on your prepared baking sheets, leaving a little space between each cookie. Bake for 8-10 minutes.
- Kiss Time!: As soon as you take the cookies out of the oven, immediately press a Hershey’s Kiss into the center of each cookie. Be careful; they’ll be hot! The heat of the cookies will soften the chocolate just enough.
- Cool and Enjoy: Let the cookies cool completely on the baking sheets. This is the hardest part, I know! But the cookies need to set up. Once they’re cool, you can transfer them to a wire rack. Then, dig in!
Tips for Red Velvet Blossom Cookies Success
- Don’t Overmix: Overmixing develops the gluten in the flour, making your cookies tough. Mix the dough just until the ingredients are combined.
- Soft Butter is Key: Make sure your butter is softened, but not melted. If it’s too warm, your cookies will spread too much.
- Chill the Dough (Optional): If your dough is too soft, or if you want extra-thick cookies, you can chill the dough balls in the fridge for 30 minutes before baking.
- Watch the Baking Time: Ovens vary, so keep an eye on your cookies! They’re done when the edges are set, but the centers are still soft.
- Let the Cookies Cool: Letting the cookies cool completely is essential before serving. This allows the flavors to meld and the texture to set. Plus, it gives the Hershey’s Kisses time to firm up!
And there you have it! In just a few easy steps, you’ll be enjoying the most delicious red velvet blossom cookies you’ve ever had. Get ready to impress everyone with these beauties! Happy baking!
Why You’ll Love These Red Velvet Blossom Cookies
Okay, so why are these red velvet blossom cookies so amazing? Let me tell you! I’ve made a LOT of cookies in my time, and these are truly special. They’ve got everything you could want in a cookie – looks, taste, and a whole lot of heart! Here’s why you’re going to fall head-over-heels for them:
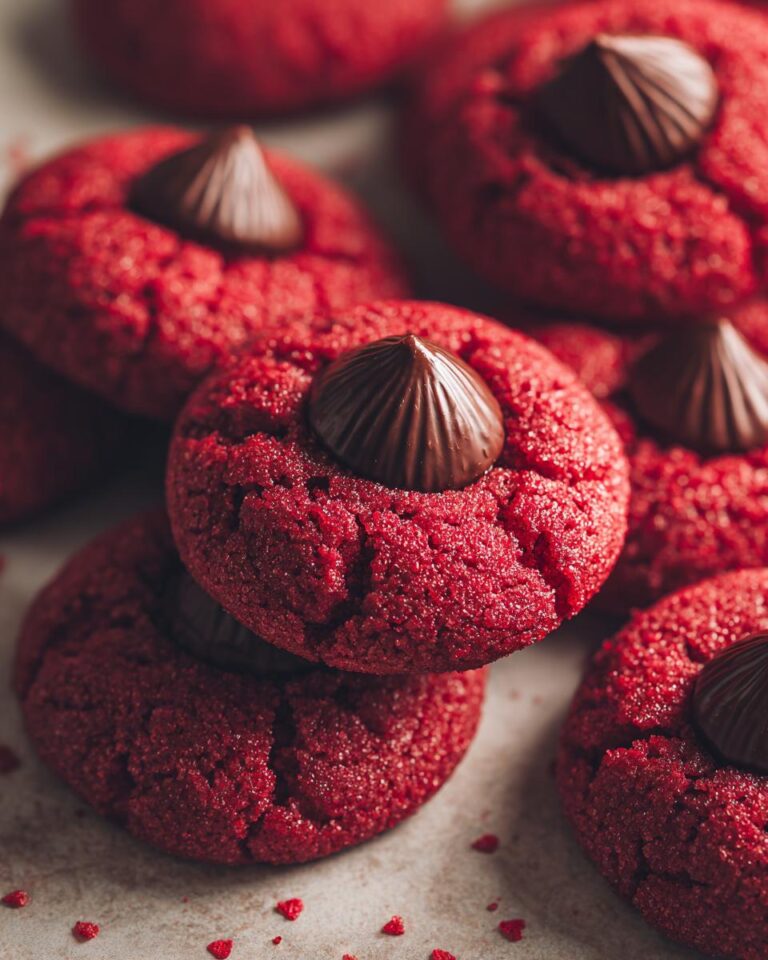
- They’re Gorgeous! Seriously, these cookies are a showstopper. That vibrant red color, the perfectly placed Hershey’s Kiss… they’re just beautiful. They’re perfect for Valentine’s Day dessert recipes, or any time you want to add a little something special.
- That Flavor! We’re talking rich, chocolatey, and just a *hint* of tang from the buttermilk. The combination of the red velvet cookie with that classic Hershey’s Kiss is pure magic. It’s a flavor explosion in every bite!
- The Texture is Perfect. They’re soft, chewy, and melt-in-your-mouth delicious. Not too cakey, not too crunchy – just the right amount of everything.
- Easy to Make! Don’t let the fancy looks fool you. These cookies are surprisingly simple to whip up. Even if you’re a beginner baker, you can totally nail this recipe!
- They’re a Crowd-Pleaser! Seriously, I’ve never met anyone who didn’t love these cookies. They’re perfect for parties, gifts, or just a sweet treat for yourself. You’ll be the hero of any gathering!
So, there you have it! These cookies are the whole package. They’re a treat for your eyes and your taste buds. Trust me, you’re going to love them! They’re so good, you might want to hide a few for yourself! These Hershey kiss thumbprint cookies are the best!

Variations on Red Velvet Blossom Cookies
Okay, so you’ve mastered the classic red velvet blossom cookies, and you’re ready to get a little adventurous? Awesome! Because honestly, these cookies are a great base for all sorts of fun flavor twists. I’m always experimenting, so I have a few ideas that’ll get your creative juices flowing. Don’t be afraid to try them! It’s all about having fun in the kitchen!
Here are a few ways you can shake things up a bit and make these cookies your own:
- Spice it Up: Add a pinch of cinnamon, nutmeg, or even a dash of cayenne pepper to the dough. A little spice can really elevate that red velvet flavor! Start small and taste as you go. You can also add a 1/2 teaspoon of ground ginger for a warm, cozy cookie.
- Add Some Zest: A teaspoon or two of orange or lemon zest can brighten up the flavors. This is especially good if you’re making these for a special occasion. If you’re going for a Valentine’s Day theme, a little bit of orange is really delicious!
- Chocolate Chips: Who doesn’t love chocolate chips? Add a handful of white chocolate chips or dark chocolate chips to the dough for extra chocolatey goodness.
- Nuts About Nuts: Chop up some walnuts, pecans, or almonds and add them to the dough for a little crunch. Just be careful if anyone has a nut allergy!
- Different Kisses: While the classic Hershey’s Kisses are perfect, you can totally experiment with different flavors! Try caramel-filled Kisses, dark chocolate Kisses, or even peppermint Kisses for a festive touch.
- A Touch of Salt: A sprinkle of flaky sea salt on top of the cookies before baking can really bring out the flavors. It’s that sweet and salty combo that’s totally addictive!
- Add Espresso Powder: A teaspoon of espresso powder can enhance the chocolate flavor.
Honestly, the possibilities are endless! Don’t be afraid to get creative and see what you come up with. Maybe you’ll discover a new favorite variation! The best part about baking is experimenting, so have fun with it! I can’t wait to hear what you come up with! And remember, these red velvet blossoms cookies are super adaptable to create delicious Hershey kiss thumbprint cookies.
Serving Suggestions for Your Red Velvet Blossom Cookies
Okay, so you’ve got a batch of those gorgeous red velvet blossom cookies, fresh out of the oven. Now what? Well, first, you eat one (or three!). But then, you might be wondering what to serve with them. These cookies are pretty versatile, so you have options! Here are some ideas to make your treat even more special:
- Milk, of Course!: Can’t go wrong with a classic! Cold milk is the perfect pairing for these cookies. Chocolate milk is also a delicious choice if you want to amp up that chocolate flavor.
- Coffee or Tea: For a more sophisticated experience, pair your cookies with a cup of freshly brewed coffee or a warm cup of tea. Earl Grey or English Breakfast tea would complement the flavors beautifully.
- Hot Chocolate: On a chilly day, what could be better than warm, creamy hot chocolate with a plate of these cookies? It’s a match made in heaven!
- Ice Cream: Okay, hear me out! Crumble a few red velvet blossom cookies over a scoop of vanilla ice cream. The combination of warm, soft cookie with cold, creamy ice cream is amazing. Chocolate ice cream also works, of course!
- Other Desserts: Want to create a whole dessert spread? These cookies are great alongside other treats! Consider serving them with a simple chocolate mousse, some fresh berries, or even a slice of cheesecake.
- A Glass of Wine: For a grown-up treat, try pairing these with a glass of dessert wine, like a Moscato d’Asti. The sweetness of the wine will complement the cookies perfectly!
Honestly, the possibilities are endless! The best part is experimenting and finding your favorite combination. So go ahead, get creative, and enjoy those red velvet blossom cookies! They’re delicious all on their own, but they’re even better with a little something extra. These cookies are even great to bring to a party with some hot chocolate, and the host will love you for it!
Storage and Reheating Instructions
So, you’ve baked a batch of these amazing red velvet blossom cookies, and you’ve got some leftovers? (If so, congrats on not eating them all in one sitting! I have trouble with that, myself!). Don’t worry, I’ve got you covered on how to keep those cookies fresh and delicious for as long as possible. Nobody likes a stale cookie, right?
Here’s the deal:
- Storage is Key: To keep your red velvet blossom cookies at their best, store them in an airtight container at room temperature. A cookie jar, a plastic container, or even a ziplock bag will work. Make sure they’re completely cool before you put them away, or they’ll get soggy!
- How Long They Last: Properly stored, these cookies will stay fresh and delicious for about 3-5 days. But honestly, they usually don’t last that long in my house!
- Freezing for the Win!: Want to make them last even longer? You can totally freeze these cookies! Just place the cooled cookies in a freezer-safe bag or container, separating layers with parchment paper to prevent sticking. They’ll keep in the freezer for up to 2 months.
- Reheating Magic: Okay, so you want to enjoy a frozen cookie? No problem! You can thaw them at room temperature for a few hours, or you can gently reheat them. For a quick warm-up, pop them in the microwave for a few seconds (5-10 seconds should do the trick). Or, you can reheat them in a preheated oven at 300°F (150°C) for a few minutes. This will bring them back to their soft, chewy best. Be careful not to over-bake them, you don’t want them to get hard!
And that’s it! With these simple tips, you can enjoy your red velvet blossom cookies for days, or even weeks, to come. So go ahead, bake a batch, and don’t worry about leftovers. They’ll be delicious whether you eat them right away or save them for later. These cookies are perfect for those Valentines Day dessert recipes!
Frequently Asked Questions About Red Velvet Blossom Cookies
Alright, before you get to baking those gorgeous red velvet blossom cookies, I figured I’d answer a few common questions. I get these all the time, so hopefully, this helps you out! Baking should be fun, not frustrating, so let’s clear up any confusion before we get started!
Absolutely! This is one of my favorite time-saving tricks. You can totally make the cookie dough ahead of time, which is perfect if you’re planning on baking these for a party. Just make the dough, cover it tightly with plastic wrap or pop it in an airtight container, and store it in the refrigerator for up to 2-3 days. When you’re ready to bake, let the dough sit at room temperature for about 30 minutes to soften up a bit before you roll it into balls. You might need to add a few extra minutes to the baking time if the dough is still cold. Easy peasy!
How can I prevent the Hershey’s Kisses from melting?
Oh, this is a good one, and something I’ve learned from experience! You definitely don’t want melted Hershey’s Kisses all over your baking sheet! The key is to get the timing just right. Bake the cookies until they’re just set around the edges, but still soft in the center. Then, take the cookies out of the oven and immediately press the Hershey’s Kisses into the warm cookies. The residual heat will soften the chocolate just enough without completely melting it. If your kitchen is super warm, you can even pop the baking sheet with the cookies and Kisses into the freezer for a few minutes to help them set up faster. Also, don’t overbake the cookies! That’s the biggest culprit for melted chocolate. If you’re really worried, you can put the cookies in the freezer for about 10 minutes to help them set faster! These techniques will help you make some delicious Hershey kiss thumbprint cookies.
You bet! While the classic Hershey’s Kisses are perfect for this recipe, feel free to experiment with different types of chocolate. Try using caramel-filled Kisses, dark chocolate Kisses, or even peppermint Kisses for a festive twist! You could also use other chocolates, like Rolos, or even mini peanut butter cups. Just make sure the chocolate you choose is a similar size and shape so it fits nicely in the center of the cookie. This recipe is a great base for creating your own red velvet blossoms cookies. Have fun with it!

I hope that helps! Happy baking, friends! Let me know if you have any more questions! I’m always happy to help! These cookies are great for finding new Valentines day dessert recipes.
Estimated Nutritional Information for Red Velvet Blossom Cookies
Okay, so, I’m not a nutritionist or anything, but I always get asked about the nutritional info for these red velvet blossom cookies. So, I ran the recipe through a handy-dandy online calculator, and here’s what it came up with. Keep in mind, these are estimates, and they can vary depending on the exact ingredients you use, and how big or small you make your cookies! But it’s a good starting point!
Here’s what you can expect per cookie:
- Calories: Around 120
- Sugar: About 12g (that’s where the magic comes from!)
- Sodium: Approximately 50mg
- Fat: Around 6g
- Saturated Fat: Roughly 3.5g
- Unsaturated Fat: About 2g
- Trans Fat: 0g
- Carbohydrates: Approximately 16g
- Fiber: Around 1g
- Protein: About 1g
- Cholesterol: Approximately 15mg
So, there you have it! A little peek behind the scenes at the nutritional info. Enjoy those cookies, but remember, everything in moderation, right? These red velvet blossoms cookies are totally worth it, though! And remember, these are just estimates, so don’t stress too much about it! Enjoy those Hershey kiss thumbprint cookies!
Conclusion
So, there you have it, folks! My absolute, can’t-live-without-them recipe for Red Velvet Blossom Cookies! I truly hope you love these cookies as much as I do. They’re seriously the perfect treat for any occasion, and I guarantee they’ll bring a smile to anyone’s face. I’ve been baking these for so long, and I’m so happy to finally share the recipe with you!
I really hope you give this recipe a try! It’s super easy, and the results are just stunning. Don’t be afraid to get creative with the variations, either! That’s half the fun of baking, right? And hey, if you do make them, please, please, PLEASE let me know what you think! Leave a comment below and tell me how they turned out. Did you try any fun variations? I’d love to hear about it!
And if you’re feeling generous, please rate the recipe! It helps other bakers find these delicious Hershey kiss thumbprint cookies, and it makes my day to know you enjoyed them. Happy baking, friends! I can’t wait to hear all about your Valentines day dessert recipes and see how these cookies turn out for you!
For more delicious recipes and baking inspiration, be sure to check out Cravy Bites on Pinterest!
Print
1 Batch = 10 Bites of Red Velvet Blossoms
- Total Time: 30 minutes
- Yield: 24 cookies
- Diet: Vegetarian
Description
Delicious red velvet cookies with a Hershey’s Kiss center.
Ingredients
- 1 cup all-purpose flour
- 1/4 cup unsweetened cocoa powder
- 1/4 teaspoon baking soda
- 1/4 teaspoon salt
- 1/2 cup (1 stick) unsalted butter, softened
- 1/2 cup granulated sugar
- 1/4 cup packed light brown sugar
- 1 large egg
- 1 teaspoon vanilla extract
- 1/4 cup buttermilk
- Red gel food coloring
- Hershey’s Kisses, unwrapped
Instructions
- Preheat oven to 375°F (190°C).
- Whisk together flour, cocoa powder, baking soda, and salt.
- Cream butter and sugars.
- Beat in egg, vanilla, and food coloring.
- Gradually add dry ingredients and buttermilk.
- Roll dough into balls.
- Place on baking sheets.
- Bake for 8-10 minutes.
- Immediately press a Hershey’s Kiss into each cookie.
- Cool completely.
Notes
- Use room temperature butter for best results.
- Don’t overbake the cookies.
- Let cookies cool before serving.
- Prep Time: 20 minutes
- Cook Time: 10 minutes
- Category: Cookies
- Method: Bake
- Cuisine: American
Nutrition
- Serving Size: 1 cookie
- Calories: 120
- Sugar: 12g
- Sodium: 50mg
- Fat: 6g
- Saturated Fat: 3.5g
- Unsaturated Fat: 2g
- Trans Fat: 0g
- Carbohydrates: 16g
- Fiber: 1g
- Protein: 1g
- Cholesterol: 15mg


 13")