Okay, friends, gather ’round because I’m about to spill the beans on a dessert that’s ridiculously easy, crazy delicious, and always a crowd-pleaser: Cherry Pie Bars! Seriously, these things disappear faster than you can say “sweet tooth.” I’m not kidding; they’re like the perfect little squares of sunshine and cherry goodness.
I started making these years ago when I was first learning to bake, and honestly, they’re still a staple in my kitchen. They’re that good! What’s so amazing is that they’re the ultimate “dump and go” dessert. You know, those recipes where you just toss everything together and *poof* – magic happens? Yeah, that’s this one. Plus, you can tweak them to your heart’s content! I’ve made tons of versions over the years, from using different fruit fillings to adding nuts… you name it, I’ve probably tried it!
I’ve spent years perfecting this recipe, tweaking the amounts, and testing different brands of ingredients, so you know it’s going to be good. I’m all about making things simple, and these Cherry Pie Bars are proof that you don’t need to be a fancy pastry chef to create something truly special. This recipe is all about ease, flavor, and making memories. So, let’s get baking!
Ingredients for Perfect Cherry Pie Bars
Alright, let’s get down to business! You won’t believe how simple the ingredient list is for these Cherry Pie Bars. Seriously, most of these things are probably already hanging out in your pantry. Here’s what you’ll need to make a batch of these beauties:
- 1 1/2 cups all-purpose flour
- 1/2 cup granulated sugar
- 1/4 teaspoon salt (don’t skip this – it balances the sweetness!)
- 3/4 cup (1 1/2 sticks) unsalted butter, cold and cubed (this is key!)
- 1 cup rolled oats (the old-fashioned kind, please!)
- 1 cup packed light brown sugar
- 1/2 teaspoon baking soda
- 1 (21 ounce) can cherry pie filling (the star of the show!)
Essential Components of Cherry Pie Bars
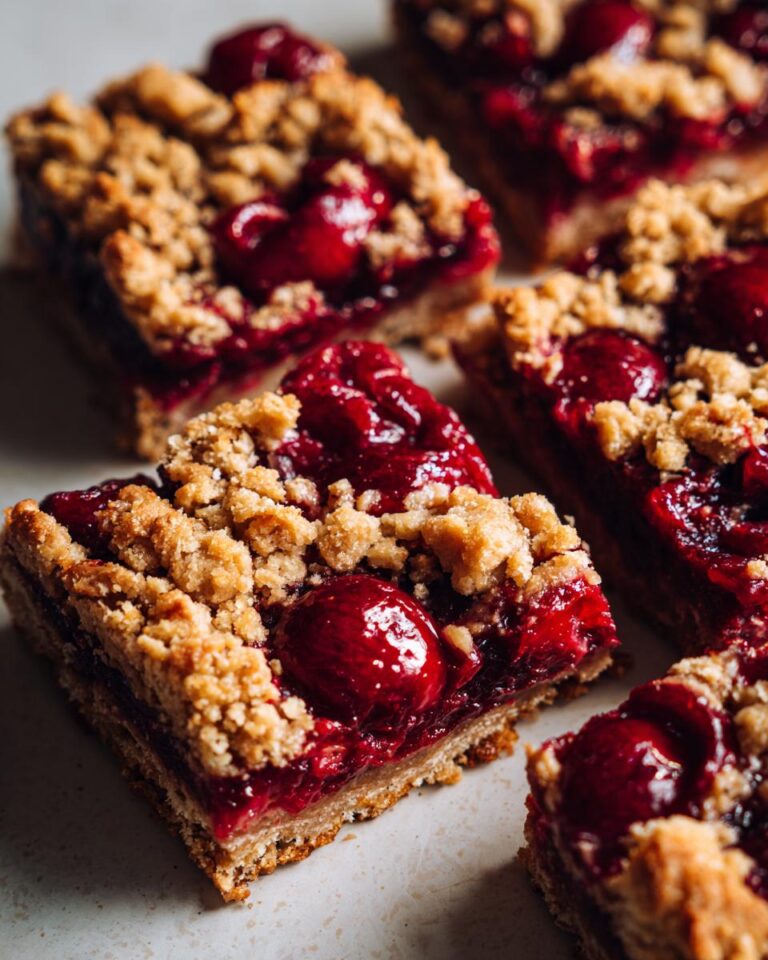
So, what makes these Cherry Pie Bars so darn good? Well, it’s all about the balance, my friends! We’ve got three main players: the crumbly, buttery crust that forms the base, the sweet and tangy cherry pie filling that’s the heart of the bar, and the oat topping that adds a delightful crunch. Each part plays a vital role in creating that perfect texture and flavor explosion. Trust me, it’s a match made in dessert heaven!
Ingredient Substitutions
Got dietary restrictions or just want to experiment? No problem! For a vegan version, you can totally swap out the butter for your favorite vegan butter alternative. Just make sure it’s the kind that acts like butter (you know, the stick kind). Everything else is good to go as is! Seriously, these Cherry Pie Bars are super adaptable. Have fun with it!
Step-by-Step Instructions: How to Make Cherry Pie Bars
Okay, let’s get those aprons on and get baking! These Cherry Pie Bars are so easy, you’ll be making them on repeat. Here’s a step-by-step guide to help you create dessert magic. Don’t worry, it’s all super simple, I promise! Just follow along, and you’ll be enjoying these bars in no time.
Preparing the Crust for Your Cherry Pie Bars
First things first, let’s get that amazing crust going! Preheat your oven to 350°F (175°C). Then, in a bowl, whisk together your flour, granulated sugar, and salt. Now, here’s the secret to a flaky crust: cold butter! Cut your cold, cubed butter into the flour mixture until it looks crumbly. I like to use a pastry cutter, but you can also use your fingers – just work quickly so the butter doesn’t warm up too much. Next, stir in those yummy rolled oats. Finally, press half of this mixture firmly into the bottom of a 9×13 inch pan. Easy, right?
Assembling the Cherry Pie Bars
Alright, time for the fun part! In a separate bowl, mix together your brown sugar and baking soda. Sprinkle this mixture evenly over the crust you just made. Now, carefully spread that glorious can of cherry pie filling over the brown sugar mixture. Make sure you get it all the way to the edges – every bite needs that cherry goodness! Finally, sprinkle the remaining oat mixture evenly over the cherry filling. See? I told you it was easy!
Baking and Cooling Your Cherry Pie Bars
Pop that pan into your preheated oven and bake for about 30-35 minutes, or until the topping is golden brown and the filling is bubbly. Keep an eye on it – ovens can be a little temperamental! Once it’s done, let the bars cool completely in the pan before you even *think* about cutting them. I know, I know, it’s torture, but trust me, this is crucial! This allows the bars to set up properly, so you get those perfect, clean squares. Patience, my friends, patience! Then, cut them up and enjoy!
Why You’ll Love This Cherry Pie Bar Recipe
Seriously, you’re going to fall head-over-heels for these Cherry Pie Bars! Here’s why:
- Easy-Peasy: Seriously, the easiest dessert recipe ever!
- Crazy Delicious: Sweet, tart, and totally irresistible.
- Versatile: Change up the fillings, add nuts… the possibilities are endless!
- Perfect for Any Occasion: From potlucks to picnics, these are always a hit.
- Minimal Ingredients: Simple ingredients, maximum flavor!
Tips for Success: Making the Best Cherry Pie Squares
Want to make sure your Cherry Pie Squares are absolutely amazing? Here are a few little tricks I’ve learned over the years to guarantee perfect results every single time. First off, make sure your butter is cold – like, straight-out-of-the-fridge cold! This is key for that perfect crumbly crust. Don’t overmix the crust either; you want it to stay nice and tender.
Next up, keep an eye on your oven! Every oven is a little different, so start checking those bars around the 30-minute mark. You’re looking for that golden-brown topping and bubbly filling. And finally, patience, my friend! Let those bars cool completely before you cut into them. Seriously, it’s worth the wait. Trust me, these little tips will make all the difference in achieving Cherry Pie Bar perfection!
Variations on Cherry Pie Bars
Okay, so you love Cherry Pie Bars? Awesome! But guess what? You can totally jazz them up! The best part about this recipe is how adaptable it is. Wanna switch things up? Go for it! You can use any pie filling you like! Think apple, blueberry, peach… whatever floats your boat. Or, get wild and mix it up! Cherry and cranberry together? Yes, please!
You can also get creative with the topping. Try adding a dash of cinnamon or nutmeg to the oat mixture for some extra warmth. Nuts? Absolutely! A handful of chopped pecans or walnuts would be amazing. Or maybe a few chocolate chips? Don’t be shy; experiment and make these Cherry Pie Bars your own!
Cherry Cranberry Pie Filling Recipes
Want to try the cherry-cranberry combo? I’m so with you! Use one can of cherry pie filling and one can of cranberry sauce (the jellied kind works great). Mix them together gently before spreading it on your crust. You can also add a teaspoon of orange zest to the filling for a little extra zing! Seriously, the tartness of the cranberry complements the sweetness of the cherry perfectly. You’re going to love it!
Serving Suggestions for Your Easy Cherry Pie Bars
Okay, so you’ve baked these amazing Easy Cherry Pie Bars… now what? Well, let me tell you, they’re delicious all on their own! But if you want to take things to the next level, here are a few ideas to make them even more irresistible. A scoop of vanilla ice cream is always a classic, of course.
You could also top them with a dollop of fresh whipped cream – so light and fluffy! Maybe a drizzle of chocolate sauce? Or how about a sprinkle of powdered sugar? Honestly, the possibilities are endless. Serve them warm or cold… either way, they’re a guaranteed hit!
Storage and Reheating Instructions
So, you’ve got leftovers? Awesome! These Cherry Pie Bars are just as good the next day, if not better, if you ask me! To keep them fresh and delicious, store them in an airtight container at room temperature. They’ll be good for about 3-4 days that way, but honestly, they probably won’t last that long!
If you prefer, you can store them in the fridge, but they might dry out a bit. To reheat, you can pop a bar in the microwave for a few seconds or warm them gently in the oven. Either way, they’ll taste amazing!
Cherry Pie Bar Recipe FAQs
Got questions about these amazing Cherry Pie Bars? I figured you might! Here are a few FAQs to help you out, so you can bake with confidence. Don’t worry, even if you mess up, they’ll still taste good!
Can I use frozen cherries? Absolutely! If you’re feeling ambitious and want to make your own filling, you totally can. Just make sure to thaw the cherries and drain off any excess liquid before using them.
How long do these bars last? If they last! Seriously, these Cherry Pie Bars are good for about 3-4 days at room temperature in an airtight container. But honestly, they usually disappear way before then in my house. You can also freeze them for a couple of months. Just wrap them up tightly!
Can I make these vegan? Yep! Super easy. Just use a vegan butter alternative in the crust and topping. Everything else is already vegan-friendly. Happy baking!
Estimated Nutritional Information for Cherry Pie Bars
Alright, just so you know, here’s a rough idea of what you’re getting nutritionally with these Cherry Pie Bars. Keep in mind that these numbers are estimates and can change depending on the ingredients and brands you use.
Print 2")
Irresistible Cherry Pie Bars: Easy Recipe (With 1 Tip)
- Total Time: 50 minutes
- Yield: 24 servings
- Diet: Vegan
Description
Delicious and easy cherry pie bars.
Ingredients
- 1 1/2 cups all-purpose flour
- 1/2 cup granulated sugar
- 1/4 teaspoon salt
- 3/4 cup (1 1/2 sticks) unsalted butter, cold and cubed
- 1 cup rolled oats
- 1 cup packed light brown sugar
- 1/2 teaspoon baking soda
- 1 (21 ounce) can cherry pie filling
Instructions
- Preheat oven to 350°F (175°C).
- Combine flour, granulated sugar, and salt.
- Cut in cold butter until crumbly.
- Stir in oats.
- Press half of mixture into a 9×13 inch pan.
- Mix brown sugar and baking soda. Sprinkle over crust.
- Spread cherry pie filling.
- Top with remaining oat mixture.
- Bake for 30-35 minutes.
- Let cool completely before cutting.
Notes
- You can use different pie fillings.
- For a vegan version, use vegan butter.
- Store in an airtight container.
- Prep Time: 20 minutes
- Cook Time: 30 minutes
- Category: Dessert
- Method: Baking
- Cuisine: American
Nutrition
- Serving Size: 1 bar
- Calories: 250
- Sugar: 25g
- Sodium: 100mg
- Fat: 12g
- Saturated Fat: 7g
- Unsaturated Fat: 4g
- Trans Fat: 0g
- Carbohydrates: 35g
- Fiber: 2g
- Protein: 3g
- Cholesterol: 0mg