Okay, friends, let’s talk turkey. Thanksgiving is my absolute favorite holiday, and for years, I wrestled with getting that bird *just right*. You know, perfectly cooked, moist meat, and skin that actually gets crispy? It felt like a miracle every time. Then, I discovered the magic of the spatchcock turkey, and let me tell you, it changed everything for me. This method is hands-down the best way to get a stunning, delicious turkey on your Thanksgiving table, and it’s way easier than you might think!
Why Spatchcock Turkey is Your Thanksgiving Secret Weapon
Seriously, why do we still roast turkeys whole when there’s a better way? Spatchcocking is the game-changer! It means you cut out the backbone and flatten the bird. This simple trick lets the turkey lay flat, allowing it to cook way more evenly. No more dry breast meat while the thighs are still raw! Plus, all that skin is exposed to the heat, giving you the crispiest, most glorious skin you’ve ever had. I remember one Thanksgiving, my turkey was a disaster – dry on top, undercooked on the bottom. Since I started spatchcocking, my guests rave about how juicy and perfect it is. It even cooks faster, which is a lifesaver on a busy Thanksgiving day. Trust me, learning how to cook a flat turkey, or in other words, mastering spatchcocking turkey, is the key to your best Thanksgiving ever.
Understanding the Spatchcock Turkey Method
So, what exactly *is* spatchcocking? It’s basically a fancy word for butterflying the turkey. You use kitchen shears or a sharp knife to cut along both sides of the backbone, then remove it completely. Once that backbone is out, you flip the turkey over, breast-side up, and press down firmly on the breastbone until you hear a crack. This flattens the bird so it cooks like a giant piece of grilled chicken. It sounds a little intimidating, but it’s super straightforward and makes a world of difference for your Spatchcock Turkey.
Essential Ingredients for Your Spatchcock Turkey
Alright, let’s get our shopping list ready for this amazing Spatchcock Turkey! You’ll need one whole turkey, about 12 to 15 pounds – make sure it’s either fresh or completely thawed out. For that delicious flavor, we’re using 2 tablespoons of unsalted butter, softened. You’ll also want a good amount of aromatics: 1 large yellow onion, quartered; 2 carrots, cut into large chunks; and 2 celery stalks, also roughly chopped. And don’t forget 4 cloves of garlic, left whole but smashed just a bit to release their flavor.

Herbs and Spices for Flavorful Spatchcock Turkey
Now for the magic! We’ll need 1 tablespoon of fresh rosemary, finely chopped. Also, 1 tablespoon of fresh thyme leaves, stripped from their stems. And of course, plenty of freshly ground black pepper – about 1 teaspoon. A good sprinkle of salt is crucial too, about 1.5 teaspoons, to really bring out all those wonderful flavors. These simple additions make all the difference!
Brining Your Spatchcock Turkey (Optional)
If you’re looking for that extra layer of juicy perfection, a brine is your friend! For a simple wet brine, you’ll need about 1 gallon of water, 1/2 cup of kosher salt, and 1/4 cup of packed brown sugar. You can also toss in a few sprigs of thyme and some peppercorns if you like. Submerging your turkey in this for about 4-6 hours before spatchcocking will give you an incredibly moist and flavorful bird. This is how you get that truly Brined Spatchcock Turkey experience!
Step-by-Step Guide to Spatchcock Turkey Perfection
Alright, let’s get this bird ready to shine! This part is where the magic really happens, and trust me, it’s not as complicated as it looks. We’re going to break it down so you can follow along easily.
Preparing the Spatchcock Turkey
First things first, let’s get that backbone out. Place your turkey breast-side down on a sturdy cutting board. You’ll see the backbone running down the middle. Using strong kitchen shears or a sharp chef’s knife, cut along one side of the backbone, all the way from the neck to the tail. Do the same on the other side. It takes a little bit of pressure, so don’t be afraid to really push! Once you’ve cut on both sides, you can lift out the backbone. Now, flip the turkey over so it’s breast-side up. Place your hands on the thickest part of the breastbone and push down firmly. You should hear a crack – that means you’ve flattened it out! If it feels super stiff, you can flip it back over and press again. This flat shape is what makes it cook so evenly.
Seasoning and Roasting the Spatchcock Turkey
Now for the fun part – seasoning! Preheat your oven to 425°F (220°C). In a small bowl, mix together your softened butter with the chopped rosemary, thyme, salt, and pepper. Gently loosen the skin over the breast and thighs by sliding your fingers underneath. Smear about half of the herb butter directly onto the meat under the skin – this is key for flavor and moisture! Rub the remaining butter all over the outside of the turkey. Place the quartered onion, carrots, and celery in the bottom of your roasting pan. Lay the prepared turkey on top of the veggies, breast-side up. Pop it into that hot oven for 20 minutes. Then, lower the oven temperature to 350°F (175°C) and continue roasting for about 12-15 minutes per pound, or until a meat thermometer inserted into the thickest part of the thigh (without touching bone) reads 165°F (74°C). The skin should be a beautiful golden brown and crispy!

Resting Your Spatchcock Turkey
This step is SO important, please don’t skip it! Once your turkey hits that perfect 165°F (74°C), carefully remove it from the oven. Tent it loosely with foil and let it rest for at least 20-30 minutes. This allows the juices to redistribute throughout the meat, ensuring every slice is incredibly moist and tender. It’s worth the wait, I promise!
Tips for a Flawless Spatchcocked Turkey
Making a perfect Spatchcock Turkey is totally achievable, and a few little tricks can make all the difference. One thing I’ve learned is to pat your turkey *really* dry with paper towels before you season it. This is super important for getting that amazing crispy skin. Seriously, get into all the nooks and crannies! Also, don’t be afraid to use a meat thermometer; it’s your best friend for hitting that perfect temperature without guessing. This whole Turkey Spatchcock Recipe is designed to be forgiving, but a little attention to detail goes a long way for a truly spectacular meal. Remember, a well-prepared Spatcocked Turkey is a happy turkey!
Achieving Crispy Skin on Your Spatchcock Turkey
Want that crackling, golden skin? Make sure your turkey is super dry before you season it. A little bit of butter or oil rubbed all over the skin helps too. And giving it that initial blast of high heat at 425°F (220°C) before lowering the temperature is key to crisping it up beautifully!
Ensuring Even Cooking with Your Spatchcock Turkey
The spatchcocking itself is the biggest step towards even cooking! But always, always use a meat thermometer. Check the thickest part of the thigh (away from the bone) and the breast. You’re aiming for 165°F (74°C) in both spots. This guarantees juicy meat without any guesswork.
Frequently Asked Questions About Spatchcock Turkey
Got questions about making the best Spatchcock Turkey? I’ve got answers! People often ask about the best temperature, and for this recipe, we start hot at 425°F (220°C) for that initial crisp, then drop it to 350°F (175°C) for even cooking. You absolutely cannot spatchcock a frozen turkey; it needs to be fully thawed for safety and even cooking. How do you know when it’s done? A meat thermometer is your best friend here – aim for 165°F (74°C) in the thickest part of the thigh. The biggest benefit over a traditional roast? Even cooking, crispier skin, and a faster cook time! It’s honestly the easiest way to nail those Whole Turkey Recipes Thanksgiving dreams, and it’s just as impressive as any traditional bird. These Flat Turkey Recipes are truly a lifesaver!
Serving Suggestions for Your Spatchcock Turkey
This glorious Spatchcock Turkey is the star, but what’s a Thanksgiving feast without amazing sides? I love pairing it with classic mashed potatoes, a fluffy stuffing, and some roasted Brussels sprouts. A tart cranberry sauce is a must for that sweet and savory bite. And of course, don’t forget to make plenty of gravy from those delicious pan drippings!
Storing and Reheating Your Spatchcock Turkey
Got leftovers of your amazing Spatchcock Turkey? Lucky you! Let them cool slightly, then carve them up and store the meat in an airtight container in the fridge for up to 3-4 days. When you’re ready to reheat, the best way to keep it moist is to do it gently. You can add a splash of broth or water to the bottom of a pan, cover it tightly with foil, and warm it in a low oven (around 300°F or 150°C) until heated through. Microwaving works too, just be quick and don’t overheat!
Estimated Nutritional Information for Spatchcock Turkey
This is just an estimate, of course, as it can vary a bit depending on your turkey and how you season it! But generally, a 6-ounce serving of this delicious Spatchcock Turkey is around 350 calories, with about 45g of protein, 15g of fat, and 0g of carbohydrates. Enjoy guilt-free!
Print
Amazing Spatchcock Turkey: 40 Min Faster
- Total Time: 2 hours 30 minutes
- Yield: 8 servings
- Diet: Vegetarian
Description
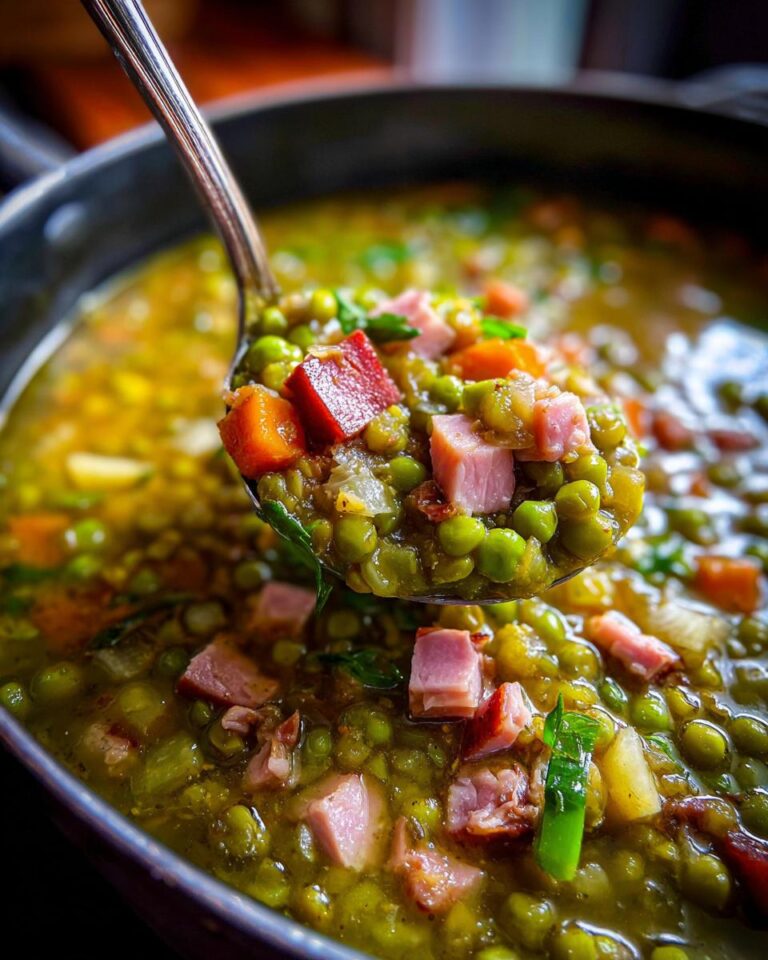
This recipe makes the best split pea soup with ham bone. It’s hearty, flavorful, and perfect for a comforting meal.
Ingredients
- 2 pounds dried split peas, rinsed
- 1 pound ham bone
- 12 cups water
- 2 cups chopped yellow onion
- 1 cup chopped carrots
- 1 cup chopped celery
- 2 cloves garlic, minced
- 1 teaspoon dried thyme
- 1/2 teaspoon black pepper
- Salt to taste
Instructions
- Combine split peas, ham bone, and water in a large pot or Dutch oven.
- Bring to a boil, then reduce heat and simmer for 1 hour.
- Remove ham bone and shred meat. Discard bone.
- Add onion, carrots, celery, garlic, thyme, and pepper to the pot.
- Return shredded ham to the pot. Stir well.
- Continue to simmer for another 1 to 1.5 hours, or until peas are tender and soup has thickened.
- Season with salt to taste.
- Serve hot.
Notes
- For a thicker soup, mash some of the peas against the side of the pot.
- You can add other vegetables like potatoes or parsnips.
- Leftovers freeze well.
- Prep Time: 15 minutes
- Cook Time: 2 to 2.5 hours
- Category: Soup
- Method: Stovetop
- Cuisine: American
Nutrition
- Serving Size: 1.5 cups
- Calories: 350
- Sugar: 8g
- Sodium: 700mg
- Fat: 10g
- Saturated Fat: 3g
- Unsaturated Fat: 7g
- Trans Fat: 0g
- Carbohydrates: 45g
- Fiber: 18g
- Protein: 25g
- Cholesterol: 60mg