Okay, get ready to seriously impress everyone this holiday season with what I think is the *ultimate* Holiday Dessert Charcuterie Board! Honestly, creating these beautiful, abundant platters is one of my favorite things to do when the holidays roll around. It just screams celebration, doesn’t it? The best part? It looks like you spent hours slaving away, but trust me, it comes together in a flash. This isn’t just throwing some snacks on a plate; it’s about creating a visually stunning centerpiece that guests can just dive into. I’ve made countless boards over the years, and the joy on people’s faces when they see this spread is just priceless. It’s all about bringing together a mix of sweet, creamy, crunchy, and chewy elements that just sing together – and making it look absolutely gorgeous is half the fun!
Why You’ll Love This Holiday Dessert Charcuterie Board
Honestly, this Holiday Dessert Charcuterie Board is a total game-changer for any get-together. It’s the perfect blend of beautiful presentation and effortless entertaining. You’re going to adore how easy it is to pull off, how it looks absolutely stunning on your table, and how everyone just raves about it!
Quick & Easy Assembly
Seriously, you can whip this whole thing up in just 20 minutes! No baking required, just a little bit of arranging. It’s perfect for those times when you need a showstopper but don’t have a ton of time.
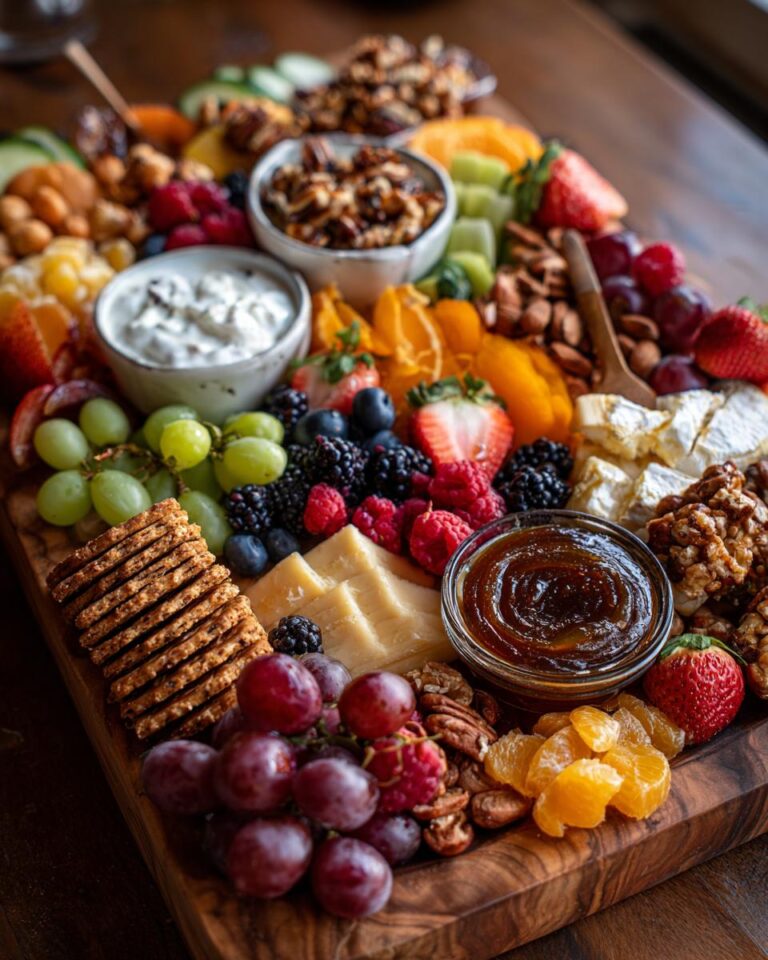
Visually Stunning Centerpiece
Forget boring dessert plates! This board is a feast for the eyes. It’s colorful, textured, and just begging to be photographed. It instantly elevates your party and becomes the talking point of the room.
Highly Customizable
This is where the fun really begins! You can totally make this board your own. Swap out fruits for what’s in season, pick your favorite cheeses, or add in little treats you love. It’s perfect for a Fall Food Charcuterie Board or any holiday theme!
Essential Ingredients for Your Holiday Dessert Charcuterie Board
Alright, let’s talk about what makes this Holiday Dessert Charcuterie Board so incredibly delicious and, well, *easy*! It’s all about picking the right mix of goodies. I’ve found that having a creamy dip, some lovely cheeses, fresh fruits, and a few fun extras really makes it shine. Remember, the goal is a beautiful balance of flavors and textures that everyone will adore. We’re talking about a board that’s as delightful to look at as it is to eat!
For the Creamy Fruit Dip
First up, this super simple fruit dip is the glue that holds a lot of this together. We’re using 2 cups of thick Greek yogurt – it’s nice and tangy. Then, we add 1/4 cup of honey for sweetness, a teaspoon of vanilla extract for that warm flavor, and a teaspoon of cinnamon to give it a cozy, festive kick. Whisk it all together, and you’ve got a dreamy dip that’s perfect for everything.
Cheeses for Sweet Pairing
Now, for the cheese! About a pound in total is usually good. I love using a mix like creamy brie, a sharp cheddar, and maybe a smooth gouda. The key here is to let your cheeses come to room temperature for about 30 minutes before assembling. Trust me, it makes a HUGE difference in their flavor and texture – they become so much more spreadable and delicious! This is essential for a great Apple And Cheese Charcuterie Board.
Fresh Fruits for Color and Crunch
You’ll want about a pound of fresh fruit to bring in color and that lovely crispness. Think sliced apples and pears – perfect for a Fall Food Charcuterie Board or an Apple Dessert Board. Grapes and berries like raspberries or blueberries are also fantastic additions. Just wash and slice them up; they add such a beautiful, fresh element.

Sweet & Savory Accents
To round things out, let’s add some texture and extra sweetness! I like to scatter about a cup of assorted nuts – walnuts, pecans, or almonds work great. Then, about half a cup of dried fruits like cranberries or apricots add a chewy sweetness. Don’t forget a little bowl of chocolate chips and a drizzle of caramel sauce for that extra indulgence. And of course, a variety of crackers and cookies are a must for scooping and nibbling!
How to Assemble Your Holiday Dessert Charcuterie Board
Okay, now for the fun part – putting it all together! Making this Holiday Dessert Charcuterie Board is more like an art project than actual cooking, and it only takes about 20 minutes total. The key is to just have fun with it and let the beautiful ingredients speak for themselves. I always start with the bigger items and then fill in the gaps. It’s super satisfying to see it all come together!
Prepare the Flavorful Fruit Dip
First things first, let’s make that amazing dip. Grab a small bowl and whisk together the Greek yogurt, honey, vanilla, and cinnamon. You want it smooth and creamy, like a thick frosting. This is going to be a star player for dipping all those fruits and crackers!
Arrange the Cheeses
Grab your largest platter or a nice wooden board – this is your canvas! Start by placing your cheeses strategically around the board. I like to spread them out a bit, maybe put the brie on one side and the cheddar on another, leaving space in between for all the other goodies. Remember, room temperature cheeses are your friend here!
Add the Vibrant Fruits
Now, let’s bring in that gorgeous color! Arrange your sliced apples, pears, grapes, and berries around and in between the cheeses. Don’t be afraid to overlap a little – it makes the board look abundant and inviting. Think about contrasting colors, like the red of berries next to the green of grapes or pale pears.
Scatter the Textural Elements
Time for the nuts and dried fruits! Sprinkle these around the empty spaces on the board. They fill in any gaps and add lovely little pops of texture and sweetness. I usually just scatter them by hand – it gives that perfectly imperfect, rustic look.
Incorporate Sweet Sauces and Treats
Now for the extra indulgence! Place your small bowls of chocolate chips and caramel sauce right onto the board. These are like little treasure chests of sweetness. You can also tuck in any other small treats you’re using, like mini brownies or candies, into any remaining nooks and crannies.
Fill in with Crackers and Cookies
Finally, fill in any last empty spots with your assorted crackers and cookies. Fan them out, stack them a bit, or just tuck them in wherever there’s space. They’re perfect for scooping up the dip or pairing with cheese. And voilà, your masterpiece is complete!

Tips for the Perfect Holiday Dessert Charcuterie Board
Making a fantastic Holiday Dessert Charcuterie Board is all about a few simple tricks. It’s not just about throwing things on a plate; it’s about making it look amazing and taste even better. Here are my go-to tips for making sure your board is a total hit every single time.
Choosing Your Board
The board itself is your stage! Pick something large enough to hold all your goodies without looking cramped, but not so huge that it looks sparse. A nice wooden board or a big ceramic platter works beautifully.
Flavor and Texture Balance
Variety is key! Make sure you have a good mix of creamy (like the dip and brie), crunchy (nuts, crisp apples), chewy (dried fruits), and sweet (chocolate, caramel). This balance makes every bite exciting.
Presentation Matters
Don’t be afraid to let things overlap a little – it makes the board look super abundant. Fill in all the little gaps so there are no empty spaces. Think about color contrast, too; placing bright berries next to pale cheese looks fantastic!
Frequently Asked Questions About Holiday Dessert Charcuterie Boards
Got questions about creating the perfect Holiday Dessert Charcuterie Board? I’ve got you covered! This is my absolute favorite way to entertain during the holidays, and I’ve learned a few things along the way. Let’s dive into some common queries so your board is a total success!
What are good alternatives to cheese on a Holiday Dessert Charcuterie Board?
Oh, absolutely! If cheese isn’t your thing, or you want even more sweet options, think about adding mini cupcakes, rich brownies cut into small squares, or maybe some fancy shortbread cookies. You could even add little pots of mousse!
How do I keep my Holiday Dessert Charcuterie Board fresh?
The best trick is to assemble it as close to serving time as possible, ideally within an hour or two. For fruits like apples and pears, a little squeeze of lemon juice mixed with water can help prevent browning. Keep any dips or sauces chilled until just before you set the board out.
Can I make this a Fall Food Charcuterie Board?
You bet! This board is super adaptable for a Fall Food Charcuterie Board. Just swap in seasonal fruits like apples, pears, and persimmons. Add some spiced nuts, maple cookies, and maybe some pumpkin-flavored treats. It’s perfect for an Apple And Cheese Board with those fall vibes!
Storing and Reheating Your Holiday Dessert Charcuterie Board
Okay, so you’ve got some gorgeous leftover Holiday Dessert Charcuterie Board goodness? Awesome! Storing it is pretty simple. The best way is to carefully remove the fruit dip into an airtight container and pop that in the fridge. It should stay good for about 3-4 days. For the rest of the items – the cheeses, fruits, nuts, and chocolates – it’s usually best to store them separately in their own containers in the refrigerator. Things like crackers and cookies might get a little soft, so they’re best enjoyed fresh, but you can store them in a sealed bag or container too. Honestly, most of this board is best eaten fresh, but if you have some leftover fruit dip, you can totally enjoy it with fresh fruit later in the week!
Estimated Nutritional Information
Just a heads-up, these numbers are estimates and can totally change depending on exactly what you put on your Holiday Dessert Charcuterie Board! This breakdown is based on roughly 1/8th of the board, but remember, everyone’s serving size is a little different. You’re looking at about 450 calories, with around 30g of sugar and 25g of fat per serving. It’s a treat, after all!
If you need more inspiration, check out CravyBites on Pinterest!
Print
Amazing Holiday Dessert Charcuterie Board
- Total Time: 20 minutes
- Yield: 8-10 servings
- Diet: Vegetarian
Description
A festive and easy-to-assemble dessert charcuterie board perfect for holidays and fall gatherings. It features a variety of sweet and savory elements, including fruits, cheeses, dips, and treats, creating a visually appealing and delicious centerpiece.
Ingredients
- 2 cups Greek yogurt
- 1/4 cup honey
- 1 tsp vanilla extract
- 1 tsp cinnamon
- 1 lb assorted cheeses (e.g., brie, cheddar, gouda)
- 1 lb assorted fruits (e.g., apples, pears, grapes, berries)
- 1 cup assorted nuts (e.g., walnuts, pecans, almonds)
- 1/2 cup dried fruits (e.g., cranberries, apricots)
- 1/4 cup chocolate chips
- 1/4 cup caramel sauce
- Assorted crackers and cookies
Instructions
- In a small bowl, whisk together Greek yogurt, honey, vanilla extract, and cinnamon to create the fruit dip.
- Arrange the assorted cheeses on a large platter or board.
- Add the assorted fruits, focusing on a colorful and balanced presentation.
- Scatter the nuts and dried fruits around the cheeses and fruits.
- Place small bowls of chocolate chips and caramel sauce on the board.
- Arrange assorted crackers and cookies around the other elements.
- Serve immediately.
Notes
- Customize the fruits and cheeses based on seasonality and personal preference.
- Consider adding other sweet treats like mini cupcakes or brownies.
- Ensure cheeses are at room temperature for optimal flavor and texture.
- Prep Time: 20 minutes
- Cook Time: 0 minutes
- Category: Dessert
- Method: Assembly
- Cuisine: American
Nutrition
- Serving Size: 1/8th of the board
- Calories: 450
- Sugar: 30g
- Sodium: 300mg
- Fat: 25g
- Saturated Fat: 12g
- Unsaturated Fat: 13g
- Trans Fat: 0g
- Carbohydrates: 40g
- Fiber: 5g
- Protein: 15g
- Cholesterol: 60mg


 13")