Okay, friends, let’s talk Cheez-Its! Remember those little orange squares of cheesy goodness? Total childhood staple, right? I swear, I could eat a whole box in one sitting. But you know, as I got older, I started thinking, “Hmm, what’s *actually* in these things?” And that’s when my quest for the perfect, *real* cheddar cheese version of Homemade Cheez Its began!
I’m a total sucker for homemade snacks. There’s just something so satisfying about making something from scratch, knowing exactly what’s going into it. Plus, you get to control the flavor! And let’s be honest, it’s way more fun than buying a bag from the store. My family and I have always been snackers. We love having a little something to munch on while we watch a movie or play games. The store-bought Cheez-Its just weren’t cutting it for us anymore, so I set out to make my own. This recipe? It’s the Cheese Knees, I tell you! We’re talking real cheddar cheese, people. No weird stuff, just pure cheesy, crispy bliss. Get ready to ditch the store-bought and embrace the deliciousness of Homemade Cheez Its (real cheddar cheese)!
Why You’ll Love These Homemade Cheez Its (real cheddar cheese)
Seriously, folks, these Homemade Cheez Its (real cheddar cheese) are a game-changer! Forget those sad, stale store-bought versions. These are bursting with fresh, cheesy flavor, thanks to that real cheddar. You’ll be amazed at how much better they taste, I promise!
Taste the Difference
The flavor? Out of this world! You can actually *taste* the cheddar, and the perfect balance of salt and spices. It’s the kind of snack that’ll have you reaching for more, guaranteed.
Simple Ingredients, Big Flavor
The best part? It’s so easy! You won’t believe how simple it is to whip up a batch. And you know *exactly* what’s in them – no mystery ingredients here, just pure, cheesy goodness.
Fun for All Ages
Plus, making these is a blast! Get the kids involved, or make it a fun activity for a weekend afternoon. Trust me, everyone will love these!
Homemade Cheez Its (real cheddar cheese): Ingredients You’ll Need
Alright, let’s talk ingredients! For these amazing Homemade Cheez Its (real cheddar cheese), you’re going to need a few simple things. Don’t worry, nothing too crazy! You’ll need 1 1/4 cups of all-purpose flour. Make sure it’s all-purpose, trust me. You’ll also need 1/2 teaspoon of salt, 1/4 teaspoon of paprika (for that color!), and 1/4 teaspoon of garlic powder. A stick (1/2 cup) of cold, unsalted butter, cubed is very important. And, of course, the star: 1 cup of sharp cheddar cheese, shredded. Finally, you’ll need 1/4 cup of ice water.
Ingredient Breakdown
So, let’s break down these ingredients, shall we? Each one plays a super important role in creating those perfect, crispy Homemade Cheez Its!
Flour Power: Choosing the Right Flour
We’re using all-purpose flour here, folks. It gives the Cheez Its the right texture and structure. You *could* experiment with a blend, but for the first time, stick with all-purpose. It’s what works!
Cheddar Cheese: The Star of the Show
Now, this is where it gets good! You absolutely *must* use real cheddar cheese. I like sharp cheddar because it gives the best flavor, but you can definitely experiment with other types of cheddar. Just make sure it’s a good quality cheese – it makes all the difference!
Butter and Water: The Binding Agents
Cold butter is key! It creates those little pockets that make the crackers light and crispy. And the ice water? It helps bring the dough together without making it tough. Don’t skip the ice – it matters!
Step-by-Step Instructions for Perfect Homemade Cheez Its
Okay, now for the fun part: making the actual Homemade Cheez Its! Don’t worry, it’s way easier than you think. This is where the magic happens, so pay attention!
Getting Started: Preparing the Dough
First, grab your food processor. Toss in that flour, salt, paprika, and garlic powder. Pulse it a few times to get everything mixed up. Next, add the cold, cubed butter. Pulse again, until the mixture looks like coarse crumbs. See? Easy peasy! Then, toss in that gorgeous shredded cheddar cheese and pulse just until it’s combined. Now, slowly drizzle in the ice water, pulsing until the dough just starts to come together. Don’t overmix! You want a dough, not a soup!
Chilling and Rolling: The Key to Crispiness
Here’s a super important step: divide the dough in half and flatten each half into a rectangle. Wrap them up tightly in plastic wrap and pop them in the fridge for at least 30 minutes. Don’t skip this chilling step! It helps the gluten relax, which means crispier Homemade Cheez Its. When you’re ready, preheat your oven to 375°F (190°C). Then, on a lightly floured surface, roll out one rectangle of dough. Roll it *really* thin, like, almost see-through thin!
Cutting and Baking Your Homemade Cheez Its
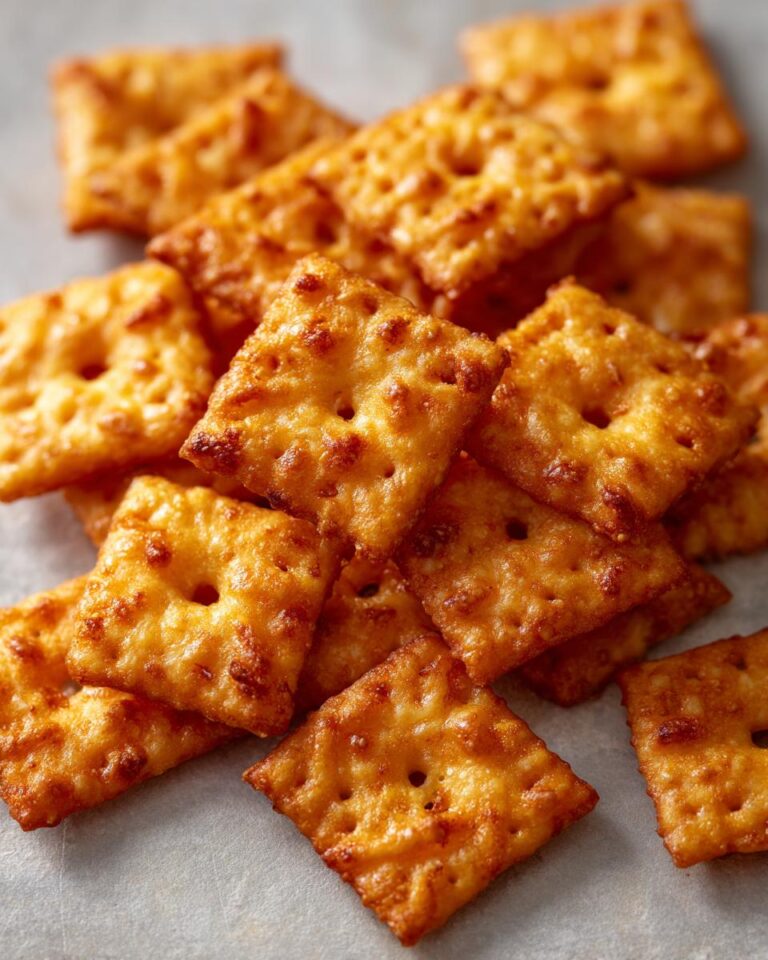
Time to cut those squares! You can use a pizza cutter (my favorite!) or a knife. Aim for little squares, about 1 inch by 1 inch. Place the squares on a baking sheet. Now, here’s a fun part: poke a little hole in the center of each cracker with a toothpick! Classic Cheez-Its, am I right? Bake them for 12-15 minutes, or until they’re golden brown and crispy. Keep an eye on them – ovens can vary!
Cooling and Serving: Finishing Touches
Once they’re out of the oven, let those Homemade Cheez Its cool *completely* on the baking sheet. This is crucial for crispiness! Seriously, resist the urge to eat them hot (it’s tough, I know!). Once they’re cool, they’re ready to eat! Or, if you have any self-control (I don’t!), store them in an airtight container.
Tips for Success: Making the Best Homemade Cheez Its
Okay, so you’ve got your dough, you’ve got your cheese dreams… now let’s talk about making these Homemade Cheez Its absolutely perfect! A few little tricks can make a huge difference, so listen up, friends!
Dough Consistency: The Secret to Crunchy Crackers
The dough should be just barely coming together. It shouldn’t be dry and crumbly, but it also shouldn’t be sticky. If it seems a little dry, add a tiny bit more ice water, just a teaspoon at a time. If it’s too wet, add a *tiny* bit more flour, but be careful! You don’t want to overwork it.
Rolling Technique: Achieving the Perfect Thinness
This is where patience pays off! Roll that dough *thin*, people. Like, really thin. You want to be able to almost see through it. This is what gives you that perfect, crispy texture. And try to roll it evenly, so your crackers bake at the same rate. This is the key to perfect Homemade Cheez Its!
Baking Time and Temperature: Getting It Just Right
Keep a close eye on your crackers! Baking times can vary depending on your oven, so start checking them around 12 minutes. You want them to be golden brown and crispy, but not burnt! If they’re browning too quickly, you can always lower the oven temp a bit. Trust your eyes – and your nose! – and you’ll be golden.
Variations: Spice Up Your Homemade Cheez Its
Okay, so you’ve got the basic recipe down, but trust me, the fun doesn’t stop there! These Homemade Cheez Its are totally customizable. Let’s get creative and add some extra pizzazz!
Cheese It Up: Cheese Variations
Don’t be afraid to experiment with different cheeses! Pepper Jack will give you a nice kick, or try a smoky Gouda for a whole other level of flavor. Even a bit of Parmesan would be amazing! Just remember to adjust the amount of salt slightly, depending on how salty your cheese is.
Spice Things Up: Adding Herbs and Spices
Want to add even more flavor? Go for it! A pinch of cayenne pepper will give your Homemade Cheez Its a little heat. Dried herbs like rosemary or thyme would be delicious too! Just sprinkle them in with the flour and salt. Think of it as your chance to be a snack artist!
Serving Suggestions for Your Homemade Cheez Its
Okay, so you’ve got this amazing batch of Homemade Cheez Its, now what? Well, the possibilities are endless, my friends! These little cheesy squares are perfect for munching on their own, but they’re also fantastic alongside other goodies!
Pairing Perfection
Think cozy soups, creamy dips, or even a fancy cheese board. Seriously, these crackers will elevate any appetizer spread! They’re also great with a cold beer or a glass of wine. Yum!
Storage & Reheating Instructions for Homemade Cheez Its
Okay, so you’ve got a whole batch of these amazing Homemade Cheez Its, but you can’t eat them all at once (I know, it’s hard!). Don’t worry, here’s how to keep them perfectly crispy and delicious!
Storing Your Crackers
The key to keeping your Homemade Cheez Its crispy is an airtight container! A plastic container with a tight-fitting lid or even a zip-top bag will do the trick. Just make sure you get all the air out. Store them at room temperature, and they should last for up to a week (if they last that long!).
Reheating for Maximum Enjoyment
If your Homemade Cheez Its lose a little crispness, no worries! You can easily revive them. Pop them in a preheated oven at 350°F (175°C) for just a few minutes, or until they’re crispy again. You can also toast them in a toaster oven for a quick fix! Easy peasy!
Frequently Asked Questions About Homemade Cheez Its
Okay, so you’ve got questions? I’ve got answers! Here are some of the most common questions I get about these Homemade Cheez Its, so you can bake with confidence! Don’t worry, I’ve got you covered!
Can I use different types of cheese for my Home Made Cheez Its?
Absolutely! Feel free to experiment with different cheeses. I love sharp cheddar, but you can try Monterey Jack, Colby, or even a blend! Just remember that different cheeses have different moisture levels and salt content. You might need to adjust the amount of salt or water a tiny bit, depending on the cheese you choose. Get creative, have fun, and find your favorite combo!
How do I store Homemade Crackers to keep them crispy?
The key to crispy crackers is an airtight container! Once your Homemade Cheez Its are completely cool, transfer them to a container with a tight-fitting lid or a zip-top bag, and squeeze out all the excess air. Store them at room temperature. They should stay nice and crispy for about a week, but honestly, they probably won’t last that long! They’re too good!
What if my dough is too dry or too wet for Make Your Own Cheez Its?
Don’t panic! Dough can be a little finicky. If your dough is too dry and crumbly, add a teaspoon of ice water at a time, pulsing after each addition, until it comes together. If it’s too wet and sticky, add a tablespoon of flour at a time, pulsing after each addition, until it forms a dough. Remember, you want a dough that’s just barely holding together. It’s all about finding that sweet spot!
Nutritional Information Disclaimer
Okay, just a quick note: the nutritional info is just an estimate, folks! It can change depending on the ingredients and brands you use. I’m not a nutritionist, so take it with a grain of salt (pun intended!).
Print: 3 Reasons To Bake! 2")
Homemade Cheez Its (real cheddar): 3 Reasons To Bake!
- Total Time: 55 minutes
- Yield: About 4 dozen crackers
- Diet: Vegetarian
Description
Make your own delicious and cheesy Homemade Cheez-Its with real cheddar cheese.
Ingredients
- 1 1/4 cups all-purpose flour
- 1/2 teaspoon salt
- 1/4 teaspoon paprika
- 1/4 teaspoon garlic powder
- 1/2 cup (1 stick) unsalted butter, cold and cut into cubes
- 1 cup sharp cheddar cheese, shredded
- 1/4 cup ice water
Instructions
- In a food processor, combine flour, salt, paprika, and garlic powder.
- Add the cold butter and pulse until the mixture resembles coarse crumbs.
- Add the shredded cheddar cheese and pulse to combine.
- Slowly add the ice water, pulsing until the dough just comes together.
- Divide the dough in half and flatten each half into a rectangle.
- Wrap in plastic wrap and chill for at least 30 minutes.
- Preheat oven to 375°F (190°C).
- Roll out one dough rectangle very thinly on a lightly floured surface.
- Cut into small squares using a pizza cutter or knife.
- Place the squares on a baking sheet.
- Poke a hole in the center of each cracker with a toothpick.
- Bake for 12-15 minutes, or until golden brown and crispy.
- Repeat with the remaining dough.
- Let cool completely before serving.
Notes
- For a spicier flavor, add a pinch of cayenne pepper.
- You can use different types of cheese.
- Store in an airtight container.
- Prep Time: 30 minutes
- Cook Time: 25 minutes
- Category: Snack
- Method: Baking
- Cuisine: American
Nutrition
- Serving Size: 6 crackers
- Calories: 150
- Sugar: 1g
- Sodium: 180mg
- Fat: 10g
- Saturated Fat: 6g
- Unsaturated Fat: 3g
- Trans Fat: 0g
- Carbohydrates: 12g
- Fiber: 1g
- Protein: 4g
- Cholesterol: 25mg


 9")