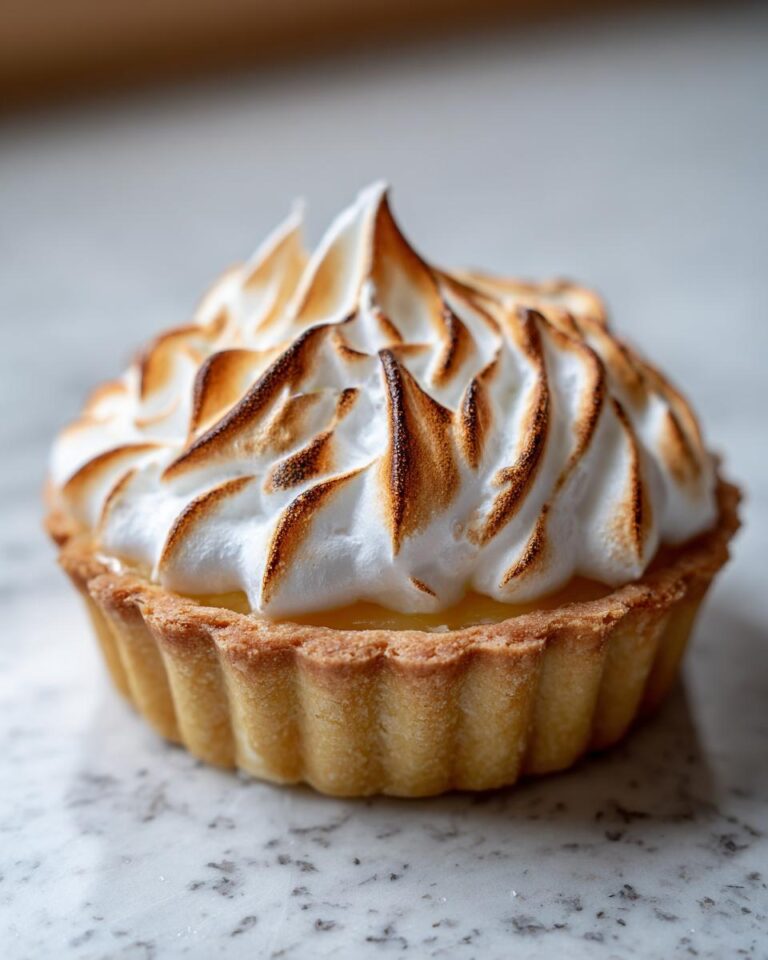
Oh my goodness, you HAVE to try these! I’m absolutely obsessed with the way these Mini Lemon Tarts with Lilac Meringue turn out. They’re just the cutest little things, with that gorgeous, pastel purple meringue on top. Seriously, they’re like tiny works of art! And the flavor? Forget about it! You get this zesty, bright lemon curd that’s perfectly balanced with the sweet, fluffy meringue. It’s a match made in dessert heaven, I tell ya.
I first made these for a fancy tea party I threw, and everyone was blown away. Now, they’re my go-to treat for any special occasion. Trust me, these aren’t just pretty; they’re ridiculously delicious. You’ll be the star of the show if you make these. Get ready for some serious compliments!
Why You’ll Love This Mini Lemon Tart with Lilac Meringue
Okay, listen up! These little tarts are seriously amazing, and here’s why you’re gonna fall head-over-heels for them too:
- Easy Peasy Lemon Squeezy: Honestly, they seem fancy, but they’re surprisingly simple to whip up. I promise!
- Flavor Explosion: That lemon curd is the perfect balance of sweet and tart – it’s pure sunshine in every bite.
- Meringue Magic: The lilac meringue isn’t just pretty; it’s light, fluffy, and adds a delightful sweetness.
- Show-Stopping Presentation: Seriously, these tarts look like they came straight out of a bakery, and everyone will be so impressed!
- Make-Ahead Friendly: You can totally make the lemon curd ahead of time, which makes party prep a breeze.
- Customizable: Want to switch up the color or add different flavors? Go for it! These are super versatile.
- Eat Dessert First Approved: Because, let’s be honest, who *doesn’t* love a little dessert action?
Ingredients for the Delightful Mini Lemon Tart with Lilac Meringue
Alright, so here’s what you’ll need to make these adorable little Mini Lemon Tarts with Lilac Meringue. Don’t worry, the list isn’t too scary, and I’ve got all the details so you know exactly what to grab:
- For the Lemon Curd:
- 1/2 cup freshly squeezed lemon juice – Fresh is key here, friends!
- 1 cup granulated sugar – Sweetness is important, but you can adjust this to your liking.
- 6 large eggs – They need to be large, or your curd might be a bit thin.
- 1/2 cup (1 stick) unsalted butter, cut into cubes – Make sure it’s cold, right from the fridge.
- For the Tarts:
- 12 pre-made mini tart shells – You can find these in the bakery section of most grocery stores. I like the ones with a buttery flavor!
- For the Lilac Meringue:
- 3 large egg whites – Make sure there’s no yolk in there!
- 3/4 cup granulated sugar – We need that sweetness!
- Pinch of salt – Just a tiny pinch to balance everything out.
- 1/4 teaspoon cream of tartar – This helps stabilize the meringue.
- Lilac gel food coloring – I find gel works best for vibrant color, but liquid is fine too if that’s what you have. Start with a tiny drop and add more until you get the perfect shade of lilac.
That’s it! See, not too bad, right? Now, let’s get baking!
Equipment You’ll Need to Create the Mini Lemon Tart with Lilac Meringue
Okay, before we get our bake on, let’s make sure you’ve got all the right tools. Trust me, having the right equipment makes everything easier and more fun! Here’s what you’ll need for these adorable Mini Lemon Tarts with Lilac Meringue:
- Mixing bowls: You’ll need a few! One for the lemon curd, one for the meringue, and maybe a couple more for measuring out ingredients.
- Whisk: A good whisk is your best friend for both the lemon curd and the meringue. Get a sturdy one!
- Saucepan: For making that luscious lemon curd. Make sure it’s a size that can handle the ingredients without overflowing!
- Kitchen torch or broiler: This is for toasting the meringue. A kitchen torch is easiest, but if you don’t have one, a broiler works too, just be super careful!
- Piping bag with a star tip (optional): If you want those pretty swirls on top, you’ll need a piping bag and a star tip. If you don’t have one, you can totally just spoon the meringue on – it’ll still be delicious!
- Baking sheet: To place your mini tart shells on before you fill them with the lemon curd. It makes it easier to move them around.
- Spatula: A spatula is really helpful for scraping down the sides of the saucepan when making the lemon curd.
- Measuring cups and spoons: Gotta measure those ingredients accurately!
- Small saucepan or heat-safe bowl: For melting butter.
That’s it! Once you have all this gear, you’re ready to get baking. Let’s make some magic happen!
Step-by-Step Instructions: How to Prepare Your Mini Lemon Tart with Lilac Meringue
Alright, let’s get down to business and make these adorable Mini Lemon Tarts with Lilac Meringue! Don’t worry, I’ll walk you through every single step, so you’ll be a pro in no time. We’ll start with the lemon curd, then fill those cute little tart shells, whip up the meringue, and finally, add that gorgeous lilac color. Ready? Let’s go!
Making the Lemon Curd for Your Mini Lemon Tart with Lilac Meringue
Okay, first things first: the lemon curd! This is where the magic starts. Grab your saucepan – I like to use a heavy-bottomed one to prevent burning. Place your lemon juice, sugar, and eggs in the saucepan. Whisk it all together until it’s nice and combined. Make sure you get rid of any lumps from the sugar. Now, over medium-low heat, cook the mixture, whisking constantly. You *have* to keep whisking, or you’ll end up with scrambled eggs – not what we want!
Keep whisking, and you’ll notice the mixture start to thicken. This will take about 5-7 minutes. It’s ready when it coats the back of a spoon. If you dip a spoon in and run your finger down the back, the curd should leave a clear trail. Take it off the heat immediately. Now, add your cold, cubed butter. Whisk until the butter is completely melted and the curd is smooth and glossy. If it looks a little lumpy, don’t worry! You can strain it through a fine-mesh sieve to get rid of any lumps. Pour the lemon curd into a heat-safe bowl, then cover it with plastic wrap, pressing the wrap directly onto the surface of the curd to prevent a skin from forming. Pop it in the fridge to chill while you get the rest ready.
Assembling the Mini Lemon Tart with Lilac Meringue: Filling and Chilling
Now, for the fun part: assembling the tarts! Take your pre-made mini tart shells and place them on a baking sheet. Once your lemon curd has cooled and is nice and thick (at least 2 hours in the refrigerator), spoon or pour the lemon curd into each tart shell. Fill them up almost to the top, but leave a little space for the meringue. Now, pop the filled tarts back in the fridge. You’ll want them to chill for at least 30 minutes, or even better, an hour. This will help the curd set up and make the tarts easier to handle when you add the meringue.
Crafting the Lilac Meringue for the Mini Lemon Tart with Lilac Meringue
Time for the star of the show: the lilac meringue! In a clean, dry mixing bowl, whisk your egg whites, sugar, and cream of tartar until stiff, glossy peaks form. This is where a stand mixer comes in handy, but you can totally do it by hand with a whisk and some elbow grease! Make sure your bowl and whisk are super clean! If there’s any grease, the meringue won’t whip up properly. Start by whisking the egg whites until foamy, then gradually add the sugar, a tablespoon at a time, whisking until the sugar dissolves. The mixture should become thick and glossy and hold stiff peaks when you lift the whisk. Now, for the fun part! Add a drop of your lilac gel food coloring and gently fold it in until you get the perfect shade of purple. Be careful not to overmix, or you’ll deflate all that lovely air!
Topping and Toasting Your Mini Lemon Tart with Lilac Meringue
Almost there! Now, for the final touches. You can either pipe the meringue onto the chilled lemon tarts using a piping bag with a star tip (for those pretty swirls) or simply spoon it on. If you’re spooning it, make sure to create some peaks and swirls for a nice look. Now, for the toasting! This is where you get that gorgeous, golden-brown color and a slightly crispy exterior. If you have a kitchen torch, carefully toast the meringue, moving the flame back and forth quickly to avoid burning it. Don’t hold the torch in one place for too long! If you don’t have a torch, you can broil the tarts in your oven. Place them on a baking sheet and put them under the broiler for just a minute or two, watching them *very* carefully. The meringue will brown quickly, so don’t take your eyes off them! And that’s it! Your beautiful Mini Lemon Tarts with Lilac Meringue are ready to serve. Enjoy!

Tips for Success with Your Mini Lemon Tart with Lilac Meringue
Okay, so you’ve made the tarts, and now you want to make them *perfect*? I hear ya! Here are a few of my favorite pro tips to make sure your Mini Lemon Tarts with Lilac Meringue turn out absolutely amazing every single time:
- Sweetness is Key: Taste your lemon curd as you make it! Everyone has a different preference for how sweet they like things. You can add a little bit more sugar to the lemon curd if you want it sweeter. Just add a tablespoon at a time and taste until it’s just right.
- Meringue Mastery: The key to perfect meringue is making sure your bowl and whisk are *squeaky* clean! Any grease will prevent the egg whites from whipping up properly. Also, don’t overmix! You want stiff, glossy peaks, but if you keep going, the meringue can become dry and grainy.
- Torch Talk: If you’re using a kitchen torch, be super careful! Hold the flame a few inches away from the meringue and move it quickly back and forth. You want to toast the outside, not burn it! Keep a close eye on it because it can go from golden to burnt in a flash.
- Chill Out: Don’t rush the chilling process! The lemon curd needs time to set, and the tarts taste so much better when they’re cold. Plus, a cold tart is easier to handle when you’re adding the meringue!
- Embrace Imperfection: Honestly, even if your tarts aren’t *perfect*, they’ll still be delicious! Don’t stress too much about the meringue swirls or anything. The most important thing is that they taste amazing. And trust me, they will!
Follow these tips, and you’ll be well on your way to Mini Lemon Tart with Lilac Meringue perfection! You got this!
Variations: Spice Up Your Mini Lemon Tarts
Okay, so you’ve mastered the basic Mini Lemon Tarts with Lilac Meringue, and you’re ready to get a little creative? Awesome! These tarts are super adaptable, so here are a few ideas to shake things up and make them your own:
- Lemon Lavender Lovelies: Add a teaspoon of dried culinary lavender to your lemon curd while it’s cooking. The lavender adds a subtle floral note that’s totally amazing with the lemon. You can strain it out after the curd has cooked, or leave it in for a rustic touch. Then, maybe add a few fresh lavender sprigs on top!
- Berry Blast Meringue: Instead of lilac, try a swirl of vibrant berry colors in your meringue! You can use a mix of red and blue gel food coloring to get a gorgeous, swirly effect. Or, if you want a natural twist, you can try adding a few tablespoons of freeze-dried raspberry powder to the meringue. It’ll give it a pretty pink hue and a lovely berry flavor!
- Chocolate Dream: For a decadent twist, you could add a layer of chocolate ganache to the tart shells *before* you add the lemon curd. Just melt some chocolate chips with a bit of heavy cream, let it cool slightly, and then pour it in. Then, proceed with the lemon curd and meringue as usual. Oh my goodness, chocolate and lemon together? Pure bliss!
Don’t be afraid to experiment! That’s the fun of baking. Play around with different flavors and toppings until you find your absolute favorite Mini Lemon Tart combination!
Serving Suggestions for Your Mini Lemon Tarts
Okay, you’ve made these gorgeous Mini Lemon Tarts, and now you want to make them a whole *experience*, right? I totally get it! They’re already amazing on their own, but here are a few ideas to really take things up a notch and make your dessert time extra special:
- Coffee or Tea, Please!: Honestly, these little tarts are the perfect pairing for a cup of coffee or tea. A simple black coffee or a delicate Earl Grey tea will complement the lemon flavor beautifully. Serve them on a pretty plate with a little spoon, and you’ve got yourself a fancy afternoon treat!
- With a Side of Fresh Fruit: Want to keep things light and refreshing? Serve your Mini Lemon Tarts with Lilac Meringue alongside some fresh berries, like raspberries or blueberries. The tartness of the berries will balance the sweetness of the meringue, and it’ll look so pretty and inviting!
- A Mini Dessert Buffet: If you’re feeling extra ambitious (and who isn’t sometimes?), create a whole mini dessert buffet! Alongside your Mini Lemon Tarts, you could add some macarons, chocolate-covered strawberries, or even another type of mini tart. It’s a great way to impress your guests and give everyone a little something they’ll love!
No matter what you choose, these Mini Lemon Tarts are sure to be a hit. Just relax, enjoy the moment, and savor every bite!
Storage and Reheating Instructions for Mini Lemon Tarts
Okay, so you’ve got leftovers? Amazing! These Mini Lemon Tarts with Lilac Meringue are so good, but if you somehow manage to have some left, here’s how to keep them tasting their best!
You can store these little beauties in the fridge for up to 3 days, tops. Just make sure to keep them in an airtight container to keep the meringue nice and fluffy – no one likes a soggy meringue! If you don’t have a container big enough, you can also loosely cover them with plastic wrap. Be gentle, though, so you don’t squish that gorgeous meringue!
As for reheating: Honestly, I don’t usually bother! These are best served cold, straight from the fridge. The lemon curd will be perfectly set, and the meringue will still be light and airy. If you *really* want to warm them up a bit, you can pop them in a preheated oven at 300°F (150°C) for just a minute or two, but keep a close eye on them!
And that’s it! Easy peasy. Just store them properly, and you can enjoy these little tart treats for a few days. If they last that long, that is!
Estimated Nutritional Information for the Mini Lemon Tart with Lilac Meringue
Okay, so you’re curious about the nitty-gritty details, right? I totally get it! While I’m not a nutritionist (I leave that to the experts!), I can give you a rough estimate of what’s in one of these delightful Mini Lemon Tarts with Lilac Meringue. Keep in mind, this is just an estimate, and the actual values can vary depending on the exact ingredients you use and how you measure them. But, hey, it’ll give you a general idea!
Here’s what you can expect per serving (that’s one yummy little tart!):
- Calories: Around 250 calories – not too bad for such a treat, right?
- Sugar: About 25g – Yes, there’s sugar, but it’s totally worth it!
- Sodium: Approximately 50mg – Not a lot of sodium here!
- Fat: Roughly 15g – Most of this comes from the butter, so good fats!
- Saturated Fat: About 8g – This is where it gets a little higher, but it’s all about balance, right?
- Unsaturated Fat: Around 5g – Yay for the good fats!
- Trans Fat: 0g – Always a bonus!
- Carbohydrates: About 28g – Mostly from the sugar and the tart shell.
- Fiber: Around 1g – Not a huge amount, but hey, every little bit helps!
- Protein: Roughly 3g – A little protein from those eggs.
- Cholesterol: About 60mg – From the eggs and butter.
So there you have it! A little peek behind the curtain at what makes these Mini Lemon Tarts so delicious. Enjoy every bite, and don’t worry too much about the numbers. It’s all about treating yourself every once in a while!
Frequently Asked Questions About Mini Lemon Tarts
Okay, so you’ve got questions? I’ve got answers! Here are a few things people always ask me about these amazing Mini Lemon Tarts. Hopefully, this helps you out!
Can I make the lemon curd ahead of time?
Absolutely YES! In fact, I highly recommend it! Making the lemon curd a day or two ahead of time is perfect. It gives the flavors a chance to meld together, and it gives you one less thing to worry about when you’re ready to assemble your Mini Lemon Tarts. Just make the curd, let it cool completely, and store it in an airtight container in the fridge. It’ll be ready and waiting when you are!
What can I substitute for the pre-made tart shells?
If you can’t find pre-made tart shells, or if you’re feeling extra ambitious, you have options! You can definitely make your own tart shells from scratch – there are tons of great recipes out there. Or, if you’re short on time, you could use puff pastry, cut it into circles, and bake it in muffin tins. You could also use mini graham cracker crusts! Any of these work. Just make sure whatever you use is sturdy enough to hold that delicious lemon curd! It all works for your own tasty Mini Lemon Tarts!
How do I store leftover meringue?
Leftover meringue? What’s that? 😉 Okay, okay, if you *do* happen to have leftover meringue (which is rare, because it’s so good!), you can store it in an airtight container in the fridge for up to 2 days. The texture might change a little, and it might weep a bit, but it’ll still be delicious! If you want to crisp it back up, you can pop it under the broiler for a minute or two, watching it *very* closely so it doesn’t burn. But honestly, the best way to store leftover meringue is to eat it right away! Those Mini Lemon Tarts are the perfect way to get rid of it!
Can I use a different color food coloring?
Of course, you can! The lilac color is pretty, but feel free to get creative with your food coloring! You could use pink, green, yellow, or any color that makes you happy! The color of your meringue doesn’t affect the flavor at all, so go wild! Maybe try a different color for each batch of Mini Lemon Tarts. Have fun with it!

Ready to Make Your Own Mini Lemon Tart with Lilac Meringue?
So, what do you think? Ready to dive in and make these gorgeous Mini Lemon Tarts with Lilac Meringue for yourself? I really hope so! They’re seriously the perfect treat for any occasion. Trust me, once you make them, you’ll be making them all the time!
I’d absolutely love to hear what you think if you decide to try this recipe! Did you love it? Did you make any fun variations? Let me know in the comments below! I’m always so excited to see what you guys are baking. And hey, if you loved it, please give it a rating! And if you’re feeling extra generous, share this recipe with your friends on social media! The more, the merrier, right? Happy baking everyone!
For more delicious dessert ideas, check out meal prep delicious.
Print
Unforgettable: 12 Mini Lemon Tarts With Lilac Meringue
- Total Time: 50 minutes
- Yield: 12 mini tarts
- Diet: Vegetarian
Description
Delightful mini lemon tarts topped with a beautiful lilac meringue.
Ingredients
- Lemon juice
- Sugar
- Eggs
- Butter
- Pre-made tart shells
- Egg whites
- Food coloring
Instructions
- Make the lemon curd.
- Fill tart shells with lemon curd.
- Make the meringue.
- Add lilac food coloring to the meringue.
- Pipe or spoon meringue onto tarts.
- Toast the meringue.
Notes
- Chill tarts before serving.
- Adjust sweetness to your liking.
- Use a kitchen torch for toasting.
- Prep Time: 30 minutes
- Cook Time: 20 minutes
- Category: Dessert
- Method: Baking
- Cuisine: French
Nutrition
- Serving Size: 1 tart
- Calories: 250
- Sugar: 25g
- Sodium: 50mg
- Fat: 15g
- Saturated Fat: 8g
- Unsaturated Fat: 5g
- Trans Fat: 0g
- Carbohydrates: 28g
- Fiber: 1g
- Protein: 3g
- Cholesterol: 60mg